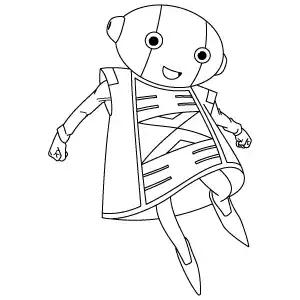
Draw a tilted oval shape to form the head, leaning slightly to the right. On each side of the head, add an oval for the ears, including small inner details to give them definition.
Step 2 - Add Facial Features and Guideline Lines
Draw two vertical curved lines across the head to serve as facial guidelines. Then, sketch the large circular eyes with simple pupils and add a small smiling mouth beneath them.
Step 3 - Sketch Zeno's Cape Base
Draw the outline of his flowing cape, starting from the base of his head on both sides. Extend it downward with smooth, wide curves to create a balanced, draped appearance.
Step 4 - Add Details to the Cape's Edges and Lines
Add parallel lines along the edges of the cape to define its borders. Then sketch vertical and curved seam lines across the fabric to enhance its structure and give the cape more depth and dimension.
Step 5 - Design the Inner Cape Pattern
Draw intricate patterns inside the front area of the cape by adding a mix of horizontal and diagonal lines. Arrange these shapes symmetrically to create a detailed design that enhances the cape’s appearance.
Step 6 - Draw Zeno's Arms and Sleeves
Sketch the arms coming out from the cape’s armholes, keeping them short and proportionate. Add the visible sleeves around the arms, then draw the small hands at the ends to complete the structure.
Step 7 - Refine Hands and Fingers
Add details to the hands by carefully refining the fingers, separating them with smooth curved lines. Adjust the overall hand shape to make it more natural and balanced with his small, simple figure.
Step 8 - Add Zeno's Legs and Shoes
Sketch his short legs extending down from beneath the cape, keeping them simple and proportional. At the bottom, draw his pointed shoes with smooth lines to complete the lower part of his figure.
Step 9 - Finalize Zeno's Complete Drawing
Review the entire drawing of Zeno, going over the main outlines of the head, cape, arms, hands, legs, and shoes. Darken the final lines, erase any extra marks, and ensure all features are clean and connected for a complete look.