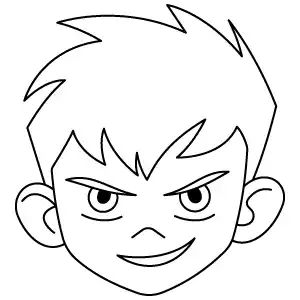
Start by sketching the basic shape of the head, giving it a smooth outline with a rounded chin. After that, draw the spiky hair on top, using sharp, simple points to make it look lively. Then add two big ears on each side of the head, keeping them round and clear so they stand out.
Step 2 – Add the Facial Features
Draw the eyes next, and give Ben thick, sharp eyebrows to show his confident look. Add the pupils inside the eyes so he looks focused. Then draw a small nose and a simple mouth to finish his expression. Add a few lines inside the ears to show the inner ear details and make the face look complete.
Step 3 – Complete the Hair
Extend the hair by drawing the big spiky shapes around the top and sides of the head. Make the spikes large and bold, with some pointing up and others angled to the sides. These bigger spikes create Ben’s signature hairstyle and help make the character instantly recognizable.
Step 4 – Finish Ben 10 Head Drawing
Finish the drawing by tracing over all the lines to make them clean and clear. Smooth out any rough edges and erase extra sketch marks. When you’re done, the outline of Ben 10’s head should look bold, neat, and ready for color.