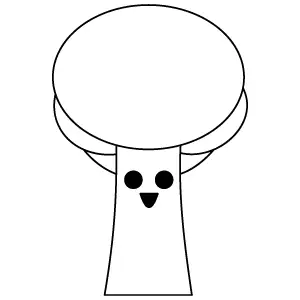
Start by sketching a simple rounded oval shape for Mr. Tree’s head. Below it, draw a narrow cylinder shape for the tree trunk, extending slightly downward. This will act as the base for adding details to Mr. Tree's face and body.
Step 2 - Draw the Branches
On each side of the head, draw curved lines connecting the head to the tree trunk. This will form the branches of the tree.
Step 3 - Add Facial Features
Below the head, draw two large, round eyes and below the eyes, draw a simple open mouth to form Mr. Tree friendly expression.
Step 4 - Finalize Mr. Tree Drawing
Go over your drawing with a darker pencil or pen to define the lines. Erase any unnecessary guidelines. Your drawing of Mr. Tree is now complete and ready for coloring or display!