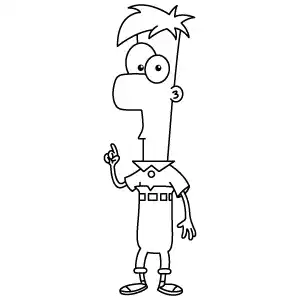
Begin by sketching two large, overlapping circles to form the eyes. Inside each eye, add a smaller filled-in circle to represent the pupils, keeping them evenly sized and properly aligned.
Step 2 - Adding the Hair
Draw Ferb’s distinctive spiky hair starting from above the eyes, making sure it extends upward. Shape the hair with sharp points and a jagged outline to match Ferb Fletcher’s recognizable hairstyle.
Step 3 - Outlining the Face and Neck
Sketch the outline of the face, making sure to include Ferb’s long protruding nose and defined jawline. Extend the neck downward from the head with straight lines. Add an ear on the side of the face, then draw the collar shape at the base of the neck.
Step 4 - Drawing the Upper Body and Arm
Outline one short-sleeved shirt sleeve on the right side. From the sleeve, draw the upper arm extending downward, and then sketch the hand with all five fingers clearly extended.
Step 5 - Sketching the Lower Body and Legs
Draw a belt across the waist and outline the pants covering the lower body, keeping the proportions consistent. Then, add the feet at the bottom, shaping them with simple shoe forms to complete the basic structure.
Step 6 - Adding Details to the Shirt and Raised Arm
Complete the shirt by drawing the left short sleeve and refining the collar details. Then, sketch the left arm raised upward, with the index finger clearly pointing. Finally, add a small button detail on the shirt near the collar.
Step 7 - Drawing the Shoes
Add details to the shoes by sketching the soles and simple straps to define their shape. Continue refining the legs by drawing small cuffs just above the shoes, completing the lower part of Ferb’s outfit.
Step 8 - Finalizing Ferb Fletcher Drawing
Darken all the outlines to make the drawing clean and bold. Finalize the details by smoothing edges and sharpening lines. Add any last touches or adjustments to ensure proper symmetry and proportion across the entire character.