Start by drawing the basic shape of the face, keeping the outline light and balanced so you can refine it later. Once the face shape is set, sketch the front section of the hair by adding small, pointed strands that fall naturally over the forehead.
Step 2 – Add the facial features
Draw the eyes, nose, and mouth to complete the main features of the face. Give the eyes clear, expressive shapes, then add a simple nose and a mouth that matches the character’s expression. Next, draw the ears on both sides of the head, making sure they line up naturally with the eyes. Add a few small lines on the cheeks to suggest subtle details, like soft shading or facial structure.
Step 3 – Draw the rest of the hair
Add the big, rounded hair surrounding the head, using long, curved lines to build up the fluffy, voluminous hairstyle. Let the hair extend outward in soft, rounded sections so it looks full and lively. Vary the curves slightly to create a natural, bouncy flow, giving the character a warm and expressive look.
Step 4 – Draw the neck and shirt
Draw the neck just below the head, keeping it short and gently curved to match the character’s proportions. Then add the shirt collar on each side, shaping it with smooth angled lines so it sits naturally around the neck. From there, sketch the shoulders extending outward, using soft curves to begin forming the upper body.
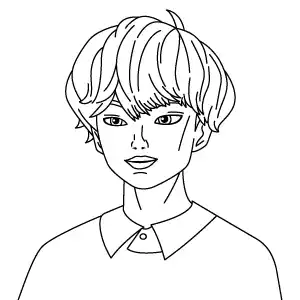
Step 5 – Complete Baby Saja Drawing
Finish the drawing by carefully going over all the important lines with clean, neat strokes, making the outline of Baby Saja smooth and well-defined. Strengthen the main shapes—such as the hair, face, and shirt collar—so they stand out clearly. Once the final linework is complete, gently erase any extra sketch marks, rough guidelines, or overlapping lines. This will leave you with a tidy, polished drawing of Baby Saja.